Nailer's blog
Node-RESTful API (1)
March 18th, 2019

Mongoose 사용하기
Mongoose란 ODM(Object Document Mapper)으로
mySQL을 사용할 때 Sequelize란 ORM(Object Relational Mapper)와 유사한 기능을 한다.
mongoose.js
const mongoose = require('mongoose')

mongoose.connect('mongodb://127.0.0.1:27017/task-manager', {
  auth: {
    "authSource": "admin"
  },
  user: 'csheum',
  password: 'password',
  useNewUrlParser: true,
})

const User = mongoose.model('User', {
  name: {
    type: String
  },
  age: {
    type: Number
  }
})

const me = new User({
  name: 'nailerHeum',
  age: 25,
})

me.save()
  .then(()=> {
    console.log(me)
  })
  .catch((error)=>{
    console.log(error)
  })
마찬가지로 권한 문제가 발생했기 때문에 관련 정보를 넣어줘야 한다.
해당하는 attribute에서 지정한 dataType을 넣어주지 않으면 validation error가 발생한다.
Task 하나를 새로 만들어봤다.
const newTask = new Task({
  description: '코드스쿼드를 들어간다.',
  completed: true,
})

newTask.save()
  .then(() => {
    console.log(newTask)
  })
  .catch((error) => {
    console.log(newTask)
  })

// 그 결과
{ _id: 5c80c374bb3cdc814e9f0ee9,
  description: '코드스쿼드를 들어간다.',
  completed: true,
  __v: 0 }
mongoose로 model의 이름을 설정할 때는 첫글자는 대문자, 단수형으로 생성한다.
mongoose를 통해 생성하면 자동으로 mongoDB에서는 모두 소문자로 바뀌며 복수형으로 만들게 된다.
예를 들어 User라고 생성하면 users로 바뀌는 것이다.
Data Validation and Sanitization
Data sanitization is the process of deliberately, permanently, and irreversibly removing or destroying the data stored on a memory device. A device that has been sanitized has no usable residual data and even advanced forensic tools should not ever be able recover erased data.
Data Validation을 통해 특정 attribute가 공란일 경우 에러를 돌려주게 만들 수 있다.
mongoose docs에서 Built-in Validator들을 확인할 수 있다.
해당 링크 : https://mongoosejs.com/docs/validation.html#built-in-validators
validator.js를 활용해서 편리하게 validation을 적용할 수 있다.
validate() method를 이용하여 커스터마이징된 validation check 가능
email: {
  type: String,
  required: true,
  trim: true,
  lovwercase: true,
  validate(value) {
    if (!validator.isEmail(value)) {
      throw new Error('Invalid Email')
    }
  }
},

password: {
    type: String,
    required: true,
    trim: true,
    validate(value) {
      if (value.length < 7 || value.includes('password')) {
        throw new Error('Invalid Password')
      }
    }
  },
trim : true 옵션은 string의 불필요한 앞뒤 공백을 제거해준다.
REST API
REST란
Representational State Transfer
API란
Application Programming Interface
HTTP method에서 가장 많이 썼던 4가지
POST, GET, PATCH, DELETE
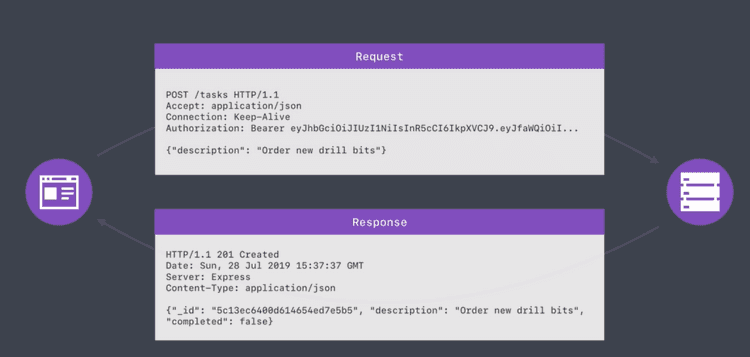
HTTP Request와 Response에 대한 간단한 예시이다.

Resource Creation Endpoint
const express = require('express')

const app = express()
const port = process.env.PORT || 3000

app.post('/users', (req, res) => {
  res.send('testing!')
})

app.listen(port, () => {
  console.log('Server is up on port ' + port)
})

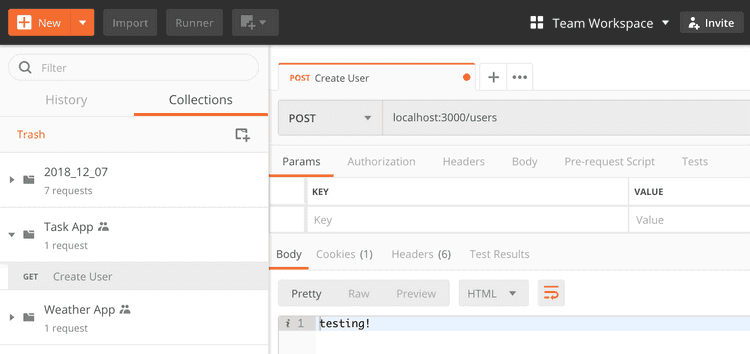
postman을 통해 간단하게 post method를 test해봤다.
목적은 유저 생성이기 때문에 Body에 JSON을 넣는다.

이러한 내용을 postman을 통해 넘겨주기로 한다.
app.post('/users', (req, res) => {
  console.log(req.body)
  res.send('testing!')
})

//result
Server is up on port 3000
{ name: 'choi',
  email: 'kingman330@gmail.com',
  password: 'seongheum123' }
req.body를 통해 넘어온다는 사실을 확인할 수 있다.
models 폴더에 user.js라는 파일을 생성하고 mongoose를 통해 작성한 user model을 따로 담아두고 export시켜 유지보수가 편하도록 한다.
POST /users에 대한 처리를 아래와 같이 추가해준다.
app.post('/users', (req, res) => {
  const user = new User(req.body)

  user.save()
    .then(() => {
      res.send(user)
    })
    .catch(error => {
    	res.send(error)
    })
})
성공시에 user를 리턴하므로 아래와 같이 GUID를 포함하여 모든 정보를 돌려보내준다.
{
    "age": 0,
    "_id": "5c8f82e29181482127fcc532",
    "name": "choi",
    "email": "kingman330@gmail.com",
    "password": "seongheum123",
    "__v": 0
}
아래와 같이 고의적으로 error를 발생시키는 data를 보내면
{
	"name": "choi",
	"email": "kingman330@gmail.com",
	"password": "1234"	// 비밀번호가 너무 짧음
}
{
"errors": {
"password": {
"message": "Path `password` (`1234`) is shorter than the minimum allowed length (7).",
"name": "ValidatorError",
"properties": {
"message": "Path `password` (`1234`) is shorter than the minimum allowed length (7).",
"type": "minlength",
"minlength": 7,
"path": "password",
"value": "1234"
},
"kind": "minlength",
"path": "password",
"value": "1234"
}
},
"_message": "User validation failed",
"message": "User validation failed: password: Path `password` (`1234`) is shorter than the minimum allowed length (7).",
"name": "ValidationError"
}이와 같이 error를 리턴해준다.
이 주소는 HTTP STATUS CODE들을 정리되어있는 곳이다.
각 코드에 대한 자세한 설명 또한 볼 수 있다.
1xx - Informational
2xx - Success
3xx - Redirection
4xx - Client Error
5xx - Server Error
따라서 위의 request의 경우 client error이므로
res.status(400) 이 적절하다.
(400은 bad request를 의미함)
Resource Reading Endpoint
app.get('/users', (req, res) => {
  User.find({})
    .then((users) => {
      res.status(200).send(users)
    })
    .catch(error => {
      res.status(500).send(error)
    })
})

app.get('/users/:id', (req, res) => {
  const _id = req.params.id	// 찾으려는 user의 id를 parameter로 보냈음

  User.findById(_id)
    .then((user) => {
      if (!user){
        res.status(404).send()
      }
      res.status(200).send(user)
    })
    .catch(error => {
      res.status(500).send(error)
    })
})
단순히 정보를 요청하는 것으로 GET method를 사용하여 users나
특정 id를 가지고 있는 user를 요청한다. mongoose에 명시되어 있는 method들을 활용하면 좀 더 다양한 방식으로 user를 요청할 수 있다.
프로젝트가 복잡해질수록 다양한 status를 적절하게 표기해주는 것을 중요하게 생각해야 한다.
작년에 했던 프로젝트를 떠올리면서 기초부터 다시 다지는 마음으로 정리해봐야겠다.